One hack of a perfect (as in jack of all trades) backup solution for Ubuntu Linux (remote, flexible, instant restore, automated, reliable)

This is a work in progress (and most likely will always be so)!

Here is what I have been working on and looking for to aquip myself with. I wanted to keep working without any hassle on my daily stuff just as I ever had and with changes to come. But at the same time I needed to be sure for a situation where I needed older versions of my files — would it be due to a system or hard disk brake down or a file deleted erroneously or changes need to be undone — to just have them there by no more than one command away. To say in short I wanted a time machine for my files that just works™ — also in at least 5 years time. In the case of recreation of older versions I want to be able to focus on what to restore and not how. And also with previous backups I have had e.g. corrupted archive files or unreadable part files/CDs to many times (one is even to many) or I’ve had issues because of too old of a file format (mostly proprietary formats).

Here is what I’ve been looking for feature-wise generally:

  • no expenses money-wise
  • robust
  • using only small and freely available tools — the more system core utils the better
  • version control
  • snapshot system
  • remote storage
  • private, i.e. secure data transmission over network and reliably encrypted storage
  • suitable for mobility, independent of how I’m connected
  • simple yet flexible usage

for daily backups:

  • automation using cron
  • no need for interaction
  • easy and flexible declaration of files or folders to omit from backup

and for restoring data:

  • just works™ (see above)
  • fast and easy look up of what versions are available at best via a GUI like Timeline with filter options
  • at very best some sort of offline functionality, e.g. caching of most likely (whatever that means) required older versions

(partly) Alternative solutions I have come across on the run

  • Suns’ z file system (zfs): Haven’t had enough time to get it working with Ubuntu Linux (because of license issues not packaged, only working via FUSE so far). Need’s partition setup thus lavish. Not sure about networking/mobility demands, e.g. remote snapshot location nor ease of use.
  • subversion together with svk: Easy and flexible to use and automate, version control per se, distributed and offline operations (svk). Contra: Recovery relays on subversion software, i.e. no cp or mv. Basic idea is to work on a copy: checkout before you start) and have daily automated commits. Should need no interactions since I’m the only one working with my “backup projects”. See this lengthy description.
  • Coda file system: distributed file system with caching. Had not enough time to try out.
  • rsnapshot: Has remote feature (ssh, rsync), automation, rotation. Relies on file systems using hard links within backup folder hierarchy for “non-incremental files” and runs as root only (system wide conf file, ssh configure issue, ssh-key, …). Workaround could be to use a specific group.
  • sshfs: FUSE add on to use remote directories via ssh transparently.
  • croned bash backup script using tar and gzip; daily incremental and monthly save “snapshot” similar to logrotate.
  • grsync: gnome GUI for rsync optimized for (incremental) backups

Update 10/2009: A few weeks ago i stumbled upon Back In Time which has astonishingly many properties of what I expect from a perfect backup solution. It basis on flyback project and TimeVault. There is a — for some people maybe a little lengthy — video on blip.tv that shows how to install and use it and how straight forward the GUI is.

Opera, Flash and Ubuntu (Feisty Fawn, Gutsy Gibbon and Hardy Heron also)

Note 08/01/08: There have been issues after the original plugin has been updated. See Ubuntu Forum, Bug description (workaround or fixed deb for firefox only which is version 9.0.115!) or comments below for more. Components have been removed that also opera needs! Yet another example why closed source is bad… Hence you might want to give gnash a go, i.e. open source flash. The new Flash version is meant to work with opera version > 9.50 Beta, though (see bottom note). Anyway, here it goes for Flash version \leq 9.0.48.0:

Note 2008/04/19: Before you get all frustrated about Flash and Opera you might enjoy operas’ ads.

Here we go

To install Adobe Flash Player after you installed Opera in Ubuntu, I found the best way is to, once again, use the debian way:

sudo aptitude install flashplugin-nonfree

After the install routine is done you need to add the path to plugins options in opera. Alternatively you could link there. To find where the new binaries are located do:

dpkg -S flashplugin-nonfree
app-install-data: /usr/share/app-install/desktop/flashplugin-nonfree.desktop
flashplugin-nonfree: /usr/lib/flashplugin-nonfree
flashplugin-nonfree: /var/cache/flashplugin-nonfree
flashplugin-nonfree: /usr/share/lintian/overrides/flashplugin-nonfree
flashplugin-nonfree: /usr/share/doc/flashplugin-nonfree
flashplugin-nonfree: /usr/share/doc/flashplugin-nonfree/changelog.gz
flashplugin-nonfree: /usr/share/doc/flashplugin-nonfree/copyright

Update 2008/04/16: The correct “list flag” for dpkg would be -L instead of -S:

dpkg -L flashplugin-nonfree | grep -i 'lib'
/usr/lib
/usr/lib/xulrunner
/usr/lib/xulrunner/plugins
/usr/lib/mozilla
/usr/lib/mozilla/plugins
/usr/lib/iceape
/usr/lib/iceape/plugins
/usr/lib/iceweasel
/usr/lib/iceweasel/plugins
/usr/lib/firefox
/usr/lib/firefox/plugins
/usr/lib/midbrowser
/usr/lib/midbrowser/plugins
/usr/lib/xulrunner-addons
/usr/lib/xulrunner-addons/plugins
/usr/lib/flashplugin-nonfree
/var/lib
/var/lib/flashplugin-nonfree

/Update

Alternatively you could link the lib’s binary to Opera’s plugin directory:

sudo ln /usr/lib/flashplugin-nonfree/libflashplayer.so /usr/lib/opera/plugins/

Some say you may need to restart opera in order for plugins to actually work. Fortunally, for me it work right away. In opera’s address field type opera:plugins to see what opera knows about flash.Update: See this blog on bleeding edge info on plugin’s development status if interested.

Ressources:

Update: This works for 7.04, a.k.a. Feisty Fawn, and 7.10, a.k.a. Gutsy Gibbon.

Update 2008/04/16: On a side note: There is the option reinstall for aptitude if one wants to make sure the newest files are all in the right places.

Update 2008/04/19:I stumbled upon the close to be release of Opera 9.5 which is currently in beta state (and has even more great features once again before Firefox has them 😉 ). Supposingly the Debian package should get flash working. I tried the i386 version for Gutsy and it did work for me.

Update 2008/06/28: Here are some command line parameters you can start Opera with. Especially useful would be -debugplugin. To use it you have to open a terminal to see the additional information:

opera -debugplugin [Enter/Return Key]

Ubuntu System Panel (aka USP2 or USP3)

Screenshot of USP Like what you see?

Now?

Well, anyway, hit the Ubuntu forums or google code base of this project to just get it and try it. For a couple more snapshots there is another thread.

Ubuntu: Give Me My Trash Can!

Taken from Personalizing Ubuntu by Keir Thomas:

The developers who designed Ubuntu’s desktop decided to keep the desktop clean of icons. This included relegating the Wastebasket icon to its own applet at the bottom-right side of the screen. Many people find using the applet a little difficult and miss the desktop trash can icon, which has been present on Windows and Mac OS desktops for more than 20 years.

The good news is that it’s easy to get the trash can back. Click Applications→System Tools→Configuration Editor. In the program window that appears, click the down arrows next to Apps, then Nautilus, and then Desktop. On the right side of the program window, put a check in the trash_icon_visible entry.

Alternatively, in the Configuration Editor, click Edit→Find and enter trash_icon_visible as a search term. Make sure that the Search Also In Key Names box has a check in it. Then click Find. The results will be listed at the bottom of the program window. Click the /apps/nautilus/desktop/trash_icon_visible entry. Then make sure there’s a check in the trash_icon_visible box.

Be careful when using the Configuration Editor program. It lets you configure just about every aspect of the GNOME desktop and doesn’t warn you when you’re about to do something devastating, so the potential for accidental damage is high!

How to find out what occupies space on your Linux hard drive

The other day I noticed that my settings directory (/etc) uses over 13 MB of my hard drive. So I wandered which package (I’m using a Debian based package managed system) makes the settings directory grow so large. After a couple of trails and errors I came up with the following sequence of commands:

$ du -h --max-depth=1 /etc 2> /dev/null | egrep '(^[5-9][0-9]{2}K)|M'
692K    /etc/X11
672K    /etc/acpi
712K    /etc/xdg
2.1M    /etc/brltty
500K    /etc/ssl
528K    /etc/mono
20K     /etc/NetworkManager
13M     /etc
$ dpkg -S '/etc/brltty'
brltty-x11, brltty: /etc/brltty
$ apt-cache show brltty | grep -A5 'Description'
Description: Access software for a blind person using a soft braille terminal
BRLTTY is a daemon which provides access to the Linux console (text mode)
for a blind person using a soft braille display.  It drives the braille
terminal and provides complete screen review functionality.
The following display models are supported:
* Alva (ABT3xx/Delphi)

Fortunatelly, I’m not blind so I could remove brltty with aptitude which then suggested to remove dependencies, too.

References:

  • Regex reference
  • Resources for advanced Ubuntu topics, eg. how to remove …-desktop meta packages with apt-get (instead of aptitude), secure networking setup, etc.

Ubuntu: Mounting remote filesystem using davfs2 (FUSE)

If you have access to some webdav server you might want to give your system access to those files as if they were local ones so you don’t have to use some interactive application every time you need access. FUSE is very useful for that very task, also because it for user space (you don’t have to be root to mount it). After this set up it’s meant to work for any application that works on that webdav directory files just the same as they would on the local (read: hard drive) file system. What needs to be done:

  1. Install davfs2 package (you might use Synaptic instead):
    $ apt-cache search davfs2
    davfs2 - mount a WebDAV resource as a regular file system
    $sudo aptitude install davfs2
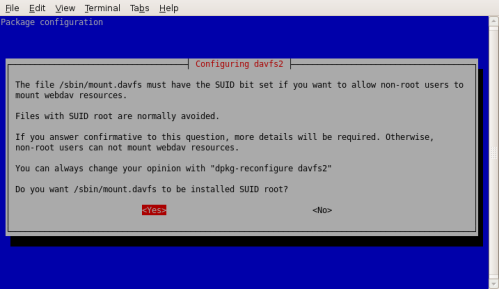
  2. reconfigure the package since it needs to run suid if normal users should be able to use it:
    sudo dpkg-reconfigure davfs2

    davfs2 SUID dpgk-reconfigure

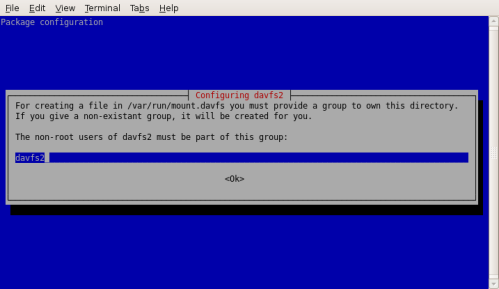
  3. After confirming to SUID davfs2 select a user group, e.g. “davfs2”:
    davfs2 group dpgk-reconfigure
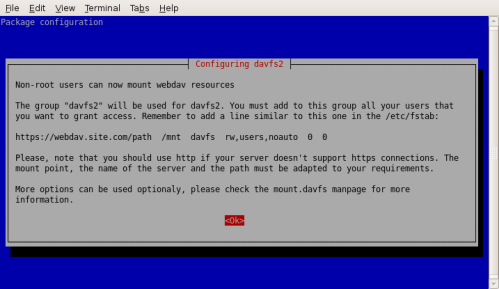
    davfs2 infoscreen dpgk-reconfigure
  4. make a mount point, i.e. a directory where the “file system” is hung into (directory webdove in a subdir of your home):
    mkdir ~/mnt/webdove
  5. to testmount use something like (use quotes to tell bash to keep it’s hands off it):
    sudo mount.davfs 'http://domain.tld/path' /path/to/webdove

    You will be prompted for user and password

  6. To allow regular users access I could only find a way where one needs to touch /etc/fstab to add a line like this one:
    http://domain.tld/davath /path/to/webdove   davfs   user,rw,noauto   0   0

    Now any user can do mount mount /path/to/webdove and umount /path/to/webdove

From the man page:

If a proxy must be used this should be configured in /home/filomena/.davfs2/davfs2.conf
proxy proxy.mycompany.com:8080

Credentials are stored in /home/filomena/.davfs2/secrets
proxy.mycompany.com filomena “my secret”
http://webdav.org/dav webdav-username password

Note: If your webdav server supports https, i.e. encrypted transfer you might use that as well. Just replace http with https above.

Even though this works and does enable the user to mount a webdave server by himself it doesn’t integrate very well into Ubuntu (as I understand it). For example the user can’t choose where to mount it. Also, there is a lot that needs to be set up correctly by the admin. I really would like to hear comments to point me to other, easier solutions (see below). A good example for user friendliness would be sshfs.

Update 2008/05/08: A nice and working description about mounting the (Germany-based) GMX-Mediacenter via secure webdav2 I have listed below. Hopefully some day I will find the time to summerize it here as it is written in German.

Resources:

Ubuntu: Using closed-source application securely with AppArmor

If you have closed-source applications installed like Opera (I do), Skype, or whatever than AppArmor should be engaged. Especially for Skype Linux it’s irresponsible without it, since Skype Linux reads /etc/passwd, Firefox profile and other files. For Ubuntu Feisty it’s meant to be in Universe and in Gutsy it will be installed on default (without profiles, though). On the community help there is an instruction on how to install and use it for Feisty and Gutsy.

References:

Ubuntu: Mounting remote filesystem using sshfs (FUSE)

Wouldn’t it be nice and handy to go to your local home directory and from there just cd into a remote one (say university stuff or via WLAN or other sometimes unsecured lines) as if it were local data? Of course there is NFS or GNOME’s network folders (that use ssh; Places -> Connect to Server…) and I guess there are heaps of other ways to do it. I chose the sshfs way because it’s

  • easy to set up
  • only needs client side (local) side preparations
  • can be set up and mounted entirely by a “normal user”
  • data line is encripted just as ssh is (because data does go via ssh)

So, what needs to be done? I’d just list the steps with only the necessary explanation. For further introduction see below.

  1. sudo aptitude install sshfs
  2. via lsmod | grep fuse see if the fuse module is there. Otherwise modprobe it (sudo modprobe fuse).
  3. see if you user name is listed in the fuse user group: grep fuse /etc/group. If not do sudo adduser yourusername fuse. You might need to logout and log back in in order for this change to take effekt.
  4. ls -la /dev/fuse should give you crw-rw---- 1 root fuse.... The ownership root:fuse is important. If not, do sudo chown root:fuse /dev/fuse
  5. Now create the mountpoint: mkdir ~/unihome
  6. Actually mount the remote fs (syntax is like the one from ssh or scp): sshfs remoteuser@remotehost:remotepath ~/unihome . If no ssh-key stuff is configured you’ll be asked your remote password

You now can cd ~/unihome or otherwise use the data there as if it was local. To unmount the remote data do fusermount -u mountpoint. Here it would be fusermount -u ~/unihome.

More comfort

To make your daily life easier you can add a file called config to your (local) home’s .ssh directory with the following lines (insert you personal data):

Host wsl01         Hostname remotemachine's-name-or-ipUser remoteuser

After that you can shorten the mount command to sshfs -oreconnect wsl01: ~/unihome to mount the entire home directory (see bottom for why -oreconnect). Of course this only works for ssh’s default to go straight into your home directory after login. From sshfsfaq:

Automatic mounting, if desired, can be added to a shell script such as .bashrc (provided authentication is done using RSA/DSA keys).

See Kevin van Zonneveld’s Blog for how to setup everything to automatically login using ssh (and thus sshfs) without beeing promted for a password. But beware not to give anyone access to your private key file (see Kevin’s note under “Pitfalls” at the bottom)! Even though the key is user and machine specific anyone that gathers access to your machine and your user can hop to the remote machine with your remote login as well. After done generating and installing the keys you need the mount command from above in your .bashrc file in your home directory. It will be unmounted on system shut down or logout.

Now, you’re done.

Update: Tweak timeout

I’ve experienced several disconnects when the connection has been idle for to long. So I digged into it. From man 5 ssh_config:

BatchMode
If set to “yes”, passphrase/password querying will be disabled. In addition, the ServerAliveInterval and SetupTimeOut options will both be set to 300 seconds by default. This option is useful in scripts and other batch jobs where no user is present to supply the password, and where it is desirable to detect a broken network swiftly. The argument must be “yes” or “no”. The default is “no”.

(…)

ServerAliveCountMax
Sets the number of server alive messages (see below) which may be sent without ssh receiving any messages back from the server. If this threshold is reached while server alive messages are being sent, ssh will disconnect from the server, terminating the session. It is important to note that the use of server alive messages is very different from TCPKeepAlive (below). The server alive messages are sent through the encrypted channel and therefore will not be spoofable. The TCP keepalive option enabled by TCPKeepAlive is spoofable. The server alive mechanism is valuable when the client or server depend on knowing when a connection has become inactive.
The default value is 3. If, for example, ServerAliveInterval (see below) is set to 15, and ServerAliveCountMax is left at the default, if the server becomes unresponsive ssh will disconnect after approximately 45 seconds. This option works when using protocol version 2 only; in protocol version 1 there is no mechanism to request a response from the server to the server alive messages, so disconnection is the responsibility of the TCP stack.

ServerAliveInterval
Sets a timeout interval in seconds after which if no data has been received from the server, ssh will send a message through the encrypted channel to request a response from the server. The default is 0, indicating that these messages will not be sent to the server, or 300 if the BatchMode option is set. This option applies to protocol version 2 only. ProtocolKeepAlives is a Debian-specific compatibility alias for this option.

So, I added a line in my .ssh/config file saying BatchMode “yes”. This, per default, gives the line $((300 / 60)) = 5 minutes (bash simple math, use with echo on the command line) until the ssh connection is dropped.

Update 2: Automounting

Add a line like the following to your /etc/fstab file (open in graphical mode with gksudo gvim /etc/fstab):

# <file system>       <mount point>         <type>  <options>
sshfs#wsl01:         /mountpointpath            fuse    optionsset 0 0

Remember to adopt the bits written itelic, i.e. wsl01, the path to your mount point and the options. A typical option set could be comment=sshfs,users,noauto,uid=1000,gid=1000,allow_other,reconnect,transform_symlinks. It’s a mixture of basic mount options and fuse and sshfs, respectively, specific options. The main ones are:

  • users: anyone can mount this filesystem
  • noauto: don’t mount automatically on system start up since network is not up, yet
  • uid=1000,gid=1000: since mount is not run with your uid/gid this is needed (find out the numbers with id command)

Now configure fuse by using /etc/fuse.conf (infos locally in less /usr/share/doc/fuse-utils/README.gz). Add user_allow_other to be able to use the fstab option allow_other.

I was writing this section in parallel while testing it myself. And I suddenly noticed it’s not what I was looking for (which was auto reconnect). More so this seams less secure than the original since with this any local user could mount it. The only advantage was to have icons on the gnome desktop (because it’s in the fstab) or if you wanted to auto mount on network up/down. See the original forum post for how to do that.

Automatic reconnect is easily done by using the -o reconnect option with sshfs: sshfs -oreconnect wsl01: ~/mountpoint.

References:

Beryl: What Linux has to offer desktop-animation-wise

First of all hit play, sit back, relax and be flabbergasted:

And now: How do you get something like that?

Troubleshooting

After I had all set up and had played around a while I wanted to see movie playback in live previews while doing the cube, switching workspaces and such. But I had the playback go black on me while the sound was playing fine. Also, I noticed if I sized the window or moved it around it showed glimpses of the video, i.e. part of a frame. Researging the net I found a blog post via ubuntuguide.org.

« Older entries